
Cooking meat to perfection requires precision. A few degrees can mean the difference between a juicy steak and a dry disappointment. Your meat thermometer serves as your most reliable kitchen tool, but only when it provides accurate readings. Unfortunately, many home cooks overlook a crucial step that ensures their thermometer works correctly. Regular calibration keeps your device reliable and your meals safe.
Why Calibration Matters for Food Safety
Temperature plays a vital role in food safety. Undercooked meat can harbor dangerous bacteria like salmonella and E. coli. Conversely, overcooking wastes money and ruins texture. Therefore, you need to trust your thermometer completely.
Most thermometers can drift from their original accuracy over time. Drops, extreme temperatures, and regular wear affect their precision. Even a brand-new thermometer might have minor manufacturing inconsistencies. Consequently, testing your device regularly protects both your health and your culinary investments.
The stakes are particularly high with poultry and ground meats. These foods require internal temperatures of at least 165°F to kill harmful pathogens. However, a thermometer reading three degrees low could leave you vulnerable to foodborne illness. On the other hand, an overly cautious reading might lead to dried-out chicken breast.
Understanding Thermometer Types
Different thermometers require different approaches to calibration. Digital instant-read thermometers are the most common in modern kitchens. These devices use electronic sensors to provide quick temperature readings. They typically feature a metal probe and a digital display.
Dial thermometers represent an older technology. These mechanical devices use a spring mechanism that expands with heat. While less precise than digital versions, they remain popular for their durability. Additionally, they never need batteries.
Some advanced models include smart thermometers with Bluetooth connectivity. These devices connect to your phone and track temperature over time. Despite their technological sophistication, they still require the same basic calibration methods.
Leave-in probe thermometers stay in the meat throughout cooking. These monitors help you track temperature without opening the oven repeatedly. Similarly, they benefit from regular accuracy checks.
The Ice Water Method Explained
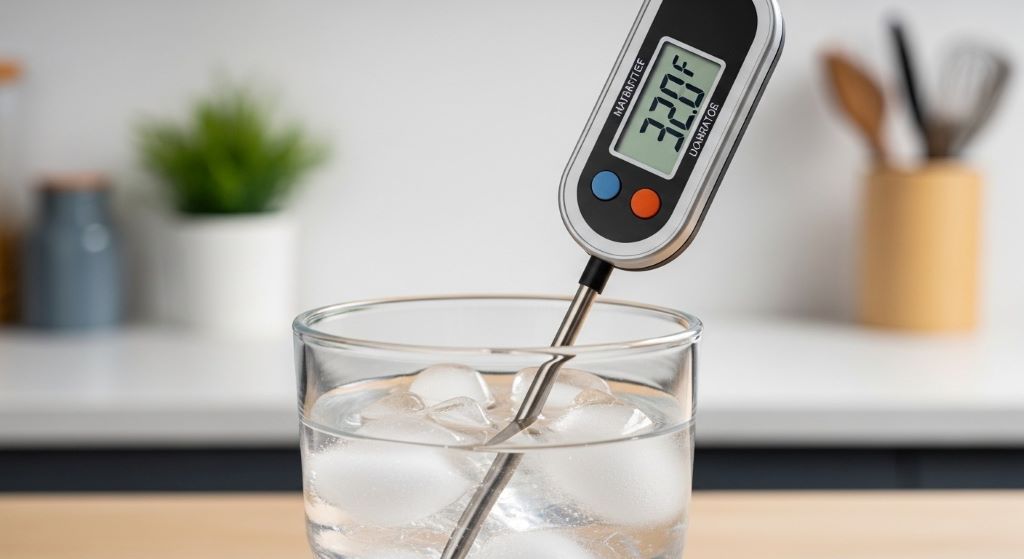
The ice water test provides the simplest way to verify your thermometer’s accuracy. This method relies on a basic scientific principle. Pure water freezes at exactly 32°F or 0°C at sea level. Therefore, ice water creates a reliable reference point.
Start by filling a large glass with ice cubes. Pack them in tightly, leaving little space between cubes. Next, add cold tap water until it reaches just below the top of the ice. The water should fill the gaps without floating the ice away.
Stir the mixture gently for about 30 seconds. This step ensures the water reaches a uniform temperature throughout. Let the glass sit for another minute to stabilize.
Insert your thermometer probe into the ice water. Make sure the tip sits in the middle of the glass. Avoid touching the sides or bottom, as these surfaces can affect the reading. Wait for the display to stabilize, which usually takes 30 seconds for digital models.
A properly calibrated thermometer should read 32°F or 0°C. However, some variation is acceptable. Most quality thermometers allow for a margin of plus or minus two degrees. If your reading falls outside this range, calibration becomes necessary.
The Boiling Water Alternative
Boiling water offers another calibration option. Water boils at 212°F or 100°C at sea level. This higher temperature point helps verify accuracy across a broader range. Nevertheless, altitude affects boiling point significantly.
For every 500 feet above sea level, water’s boiling point drops by approximately one degree Fahrenheit. Therefore, you need to adjust your expectations based on location. A quick online search can provide your area’s specific boiling point.
Bring a pot of water to a rolling boil. The bubbles should rise continuously and vigorously. Insert your thermometer probe into the water without touching the pot’s sides or bottom. These surfaces heat beyond water temperature and skew results.
Wait for a stable reading. Compare this number to the expected boiling point for your altitude. The same plus or minus two-degree tolerance applies here. This method works particularly well for checking high-temperature accuracy, which matters when grilling or searing meat.
Step-by-Step Calibration Process
Once you’ve identified an accuracy issue through testing, most digital thermometers allow for adjustment. Look for a calibration button or reset function. Many models include this feature, though its location varies by brand.
Check your thermometer’s manual for specific instructions. Some devices require holding a button combination while in ice water. Others feature a small adjustment screw near the display. Additionally, certain models automatically calibrate when you press a reset button.
For dial thermometers, locate the calibration nut beneath the dial face. Hold the probe in ice water and wait for the reading to stabilize. Use pliers or a wrench to turn the nut until the dial points to 32°F. This mechanical adjustment requires patience and a gentle touch.
Test your thermometer again after making adjustments. Repeat the calibration process to confirm the changes worked correctly. If the reading still seems off, try the process once more. Occasionally, a thermometer may need professional recalibration or replacement.
How Often Should You Calibrate
Frequency depends on usage and handling. Professional chefs often perform a thermometer accuracy check daily. Home cooks can usually calibrate less frequently. However, monthly checks provide good peace of mind for regular home cooking.
Certain events demand immediate recalibration. If you drop your thermometer, test it right away. The impact can knock sensors out of alignment. Similarly, after exposing the device to extreme temperatures, verification makes sense.
Seasonal changes can affect some thermometers. Temperature swings in your kitchen or storage area might cause drift. Therefore, checking accuracy when seasons change helps maintain reliability.
Before important meals, quick verification takes only a few minutes. Holiday dinners, special celebrations, and cooking for vulnerable populations warrant extra caution. Nobody wants to serve undercooked turkey at Thanksgiving.
Troubleshooting Common Issues
Sometimes thermometers fail calibration attempts. A reading more than five degrees off typically indicates a problem beyond simple adjustment. In these cases, replacement often proves more practical than repair.
Battery issues can mimic calibration problems in digital thermometers. Try replacing batteries before assuming the device needs recalibration. Weak batteries cause erratic readings and slow response times. Fresh batteries solve many apparent accuracy issues.
Moisture damage affects electronic thermometers significantly. Most probe stems are waterproof, but the display unit should stay dry. If water enters the housing, accuracy suffers permanently. Additionally, corrosion can develop over time with repeated exposure.
Physical damage to the probe tip prevents accurate readings. Bent or dented probes cannot properly contact the meat’s center. Inspect your thermometer regularly for visible damage. Even minor dents warrant replacement.
Maintaining Your Thermometer Between Calibrations
Proper storage extends thermometer life and maintains accuracy. Keep your device in a protective case when not in use. This practice prevents accidental drops and impacts. Additionally, a case protects the probe from bending.
Clean your thermometer after every use. Wash the probe with hot, soapy water, then sanitize with rubbing alcohol. However, never submerge the entire unit unless the manufacturer specifies it as waterproof. Most digital displays cannot handle immersion.
Avoid extreme temperature exposure during storage. Don’t leave your thermometer in a hot car or freezing garage. Room temperature storage in a kitchen drawer works best. Rapid temperature changes can affect sensor accuracy over time.
Replace batteries proactively rather than waiting for low battery warnings. Many thermometers lose accuracy as battery power decreases. Fresh batteries ensure consistent performance and extend overall device lifespan.
Choosing a Quality Thermometer
Not all thermometers are created equal. When selecting a new device, look for models with stated accuracy within one or two degrees. This specification appears in the product description or packaging. Higher accuracy costs more but provides better results.
Response time matters significantly during cooking. Fast-reading thermometers minimize heat loss from opening the oven or grill. Look for devices that provide readings in three seconds or less. This speed helps you work efficiently.
Temperature range affects versatility. A good meat thermometer should read from at least 0°F to 400°F. This range covers everything from frozen foods to searing temperatures. Some models offer even broader ranges for specialized cooking methods.
Waterproof construction simplifies cleaning and increases durability. Fully waterproof thermometers can handle accidental drops in water and thorough washing. This feature adds convenience to your cooking routine.
Digital displays should be large and easy to read. Backlit screens help in dim lighting conditions. Additionally, some models include rotating displays that adjust to your viewing angle.
Advanced Calibration Considerations
Professional kitchens sometimes use triple-point cells for calibration. These devices create precise reference temperatures for laboratory-grade accuracy. However, home cooks rarely need this level of precision. The ice water test suffices for typical cooking needs.
Some thermometers feature automatic calibration functions. These models self-adjust when exposed to known temperature points. While convenient, they still benefit from manual verification occasionally. Technology can fail, and backup checks provide security.
Calibration certificates come with professional-grade thermometers. These documents verify factory accuracy and provide traceability. Restaurant inspectors sometimes require these certificates. Home cooks don’t need this documentation, though it indicates quality manufacturing.
Multiple thermometers in one kitchen should all read consistently. If you own several devices, test them together in ice water. They should all show similar readings. Significant differences suggest one needs calibration or replacement.
The Cost of Inaccuracy
Poor thermometer accuracy costs more than you might realize. Overcooked meat wastes money on expensive cuts. A ruined prime rib or tenderloin represents significant financial loss. Moreover, consistently dry meat discourages cooking at home.
Food safety risks carry even higher costs. Foodborne illness causes discomfort, medical expenses, and lost work time. Vulnerable family members face serious health consequences from improperly cooked meat. Children, elderly relatives, and immunocompromised individuals need extra protection.
Confidence in your cooking improves with reliable tools. When you trust your thermometer, you can experiment with new recipes and techniques. This confidence leads to better meals and more enjoyable cooking experiences.
Conclusion
Calibrating your meat thermometer ensures accurate readings that protect your health and improve your cooking. The ice water test provides a simple, reliable method that takes just minutes. Regular checks maintain accuracy despite normal wear and tear. Additionally, proper maintenance and storage extend your thermometer’s useful life.
Remember to calibrate monthly for regular home cooking. Test immediately after drops or exposure to extremes. Replace batteries proactively and clean your thermometer after every use. These simple habits guarantee reliable performance when you need it most.
Accurate temperature readings transform your cooking from guesswork to science. You’ll serve safer meals, waste less food, and gain confidence in the kitchen. Therefore, take a few minutes today to verify your thermometer’s accuracy. Your family and your taste buds will thank you.
Frequently Asked Questions
How accurate should my meat thermometer be?
Most quality thermometers should read within one to two degrees of the actual temperature. Professional-grade devices offer accuracy within half a degree. However, for home cooking, a two-degree margin provides sufficient precision for both safety and quality. If your thermometer shows readings more than two degrees off during calibration tests, adjustment or replacement becomes necessary.
Can I calibrate a cheap thermometer?
Many inexpensive thermometers lack calibration features. Budget models often come factory-set without adjustment options. Nevertheless, you should still test them regularly using the methods described above. If a cheap thermometer reads inaccurately and cannot be adjusted, replacement is your only option. Investing in a mid-range adjustable thermometer often proves more economical long-term.
Does altitude affect thermometer calibration?
Altitude primarily affects the boiling water test rather than the thermometer itself. Water boils at lower temperatures as elevation increases. Therefore, you must adjust your expected boiling point based on your location. However, the ice water method works universally because freezing point remains constant at 32°F regardless of altitude. This consistency makes it the preferred calibration method for most home cooks.
Why does my thermometer give different readings in different parts of meat?
This variation occurs naturally due to uneven cooking and meat composition. The thickest part of meat cooks slowest and should be your measurement point. Additionally, bones conduct heat differently than muscle tissue. Fat pockets also affect local temperature. Always insert your thermometer into the thickest part, away from bone and fat, for the most accurate assessment of doneness.
How long do meat thermometers typically last?
With proper care, a quality digital thermometer lasts five to ten years. Dial thermometers can last even longer due to their simpler mechanical design. However, drops, moisture damage, and battery corrosion can shorten lifespan significantly. Regular calibration checks help you identify when a thermometer no longer performs reliably. Replace your device when calibration no longer brings readings within acceptable ranges.
Related Topics:
A beginner’s guide to kitchen cabinet wrapping
Six Top Kitchen Design Trends