
Insulating your garage door makes a significant difference in your home’s energy efficiency. Removable insulation panels offer a flexible solution that works for renters and homeowners alike. This guide shows you exactly how to install these panels for maximum temperature control and energy savings.
Why Choose Removable Insulation Panels
Removable panels provide versatility that permanent insulation cannot match. You can take them with you when you move or remove them seasonally. Additionally, they require no permanent modifications to your garage door.
These panels work well for rental properties where permanent changes are not allowed. Homeowners also appreciate the option to remove panels for maintenance or door repairs. Furthermore, removable panels cost less than professional insulation installation.
Energy savings make insulation worthwhile in any season. According to Energy Star, proper insulation can reduce energy costs by up to 20 percent. Your garage door represents a large surface area where heat escapes or enters your home.
Understanding Garage Door Insulation Materials
Several materials work well for removable garage door insulation. Each type offers different benefits and installation methods.
Foam board insulation provides excellent thermal resistance. Expanded polystyrene and extruded polystyrene are common options. These rigid panels cut easily and attach quickly to garage doors.
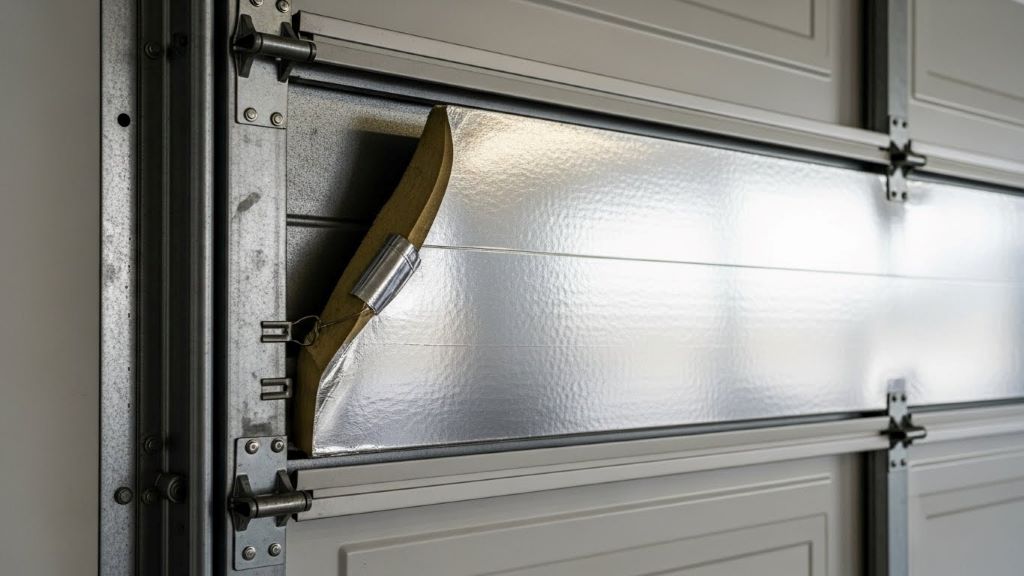
Reflective insulation uses layers of foil to reflect heat. This material works especially well in hot climates. It stays lightweight and installs with minimal tools.
Fiberglass batts offer good insulation but require careful handling. The material can irritate skin and lungs during installation. However, fiberglass provides excellent temperature control once properly installed.
Bubble wrap insulation combines air pockets with reflective surfaces. This affordable option works surprisingly well for moderate climates. The material cuts easily and weighs almost nothing.
Measuring Your Garage Door Panels
Accurate measurements ensure your insulation fits perfectly. Start by counting the number of panels on your garage door. Most residential doors have four to six horizontal panels.
Measure the width of one panel from edge to edge. Then measure the height from the top horizontal seam to the bottom seam. Write down these dimensions for each panel section.
Some garage doors have raised or recessed areas. Measure the depth of these sections carefully. Your insulation needs to fit within the recessed areas without interfering with door operation.
Take photos of your door during measurement. These pictures help when shopping for materials or cutting panels later. Additionally, photos show any irregular features that need special attention.
Gathering Necessary Tools and Materials
Collect all supplies before starting your project. This preparation saves time and prevents frustration during installation.
You will need insulation material of your choice, a utility knife or insulation saw, a measuring tape, a straight edge or T-square, safety glasses, and work gloves. Additionally, gather adhesive strips, magnetic tape, or hook-and-loop fasteners depending on your attachment method.
For foam board insulation, a fine-tooth saw works better than a utility knife for thick panels. Conversely, thin materials like bubble wrap require only scissors or a sharp utility knife.
Consider purchasing an R-value rated insulation kit designed specifically for garage doors. These kits include pre-cut panels and attachment hardware. Therefore, they simplify the process for beginners.
Preparing the Garage Door Surface
Clean your garage door thoroughly before installing insulation. Dirt and grease prevent adhesives from sticking properly. Use a degreasing cleaner and warm water to wash each panel.
Dry the door completely with clean towels. Any moisture will compromise adhesive strength. Allow extra drying time in humid conditions.
Inspect the door for damage during cleaning. Look for dents, rust, or loose hardware. Fix these issues before insulating. Otherwise, trapped moisture can worsen existing problems.
Check that your garage door opens and closes smoothly. Insulation adds weight to the door. Consequently, weak springs or motors might struggle with the additional load. Consult a garage door professional if you notice operational issues.
Cutting Insulation Panels to Size
Mark your measurements on the insulation material carefully. Use a permanent marker and straight edge for precise lines. Double-check measurements before cutting to avoid waste.
Cut foam board insulation on a stable work surface. Apply firm, steady pressure with your utility knife or saw. Make multiple light passes rather than forcing one deep cut. This technique produces cleaner edges.
For reflective insulation, cut through all layers at once. Sharp scissors or a utility knife work well. Keep cuts straight to ensure panels fit snugly against door sections.
Wear safety glasses and gloves during cutting. Insulation particles can irritate eyes and skin. Work in a well-ventilated area to minimize dust exposure.
Test-fit each panel before proceeding to the next one. Place the cut insulation against its corresponding door section. Trim any excess material for a perfect fit. Remember that panels should fit within recessed areas without bulging out.
Choosing the Right Attachment Method
Several methods secure removable insulation to garage doors. Your choice depends on insulation type, door material, and personal preference.
Adhesive strips provide strong attachment for lightweight insulation. Heavy-duty double-sided tape works well for foam board and reflective materials. Apply strips around panel edges and across the center for secure hold.
Magnetic tape offers true removability for metal garage doors. Attach one magnetic strip to the insulation and let it grip the metal door surface. This method allows quick removal for seasonal changes.
Hook-and-loop fasteners create a strong yet removable bond. Attach one side to the insulation and the other to the door surface. Press firmly to engage the fasteners. This system works on any door material.
Mechanical fasteners like clips or brackets provide the most secure attachment. However, they require drilling small holes in your door. Use this method only if permanent modifications are acceptable.
Consider combining methods for heavy insulation. For instance, use adhesive strips around edges with magnetic tape in the center. This hybrid approach distributes weight effectively.
Installing Panels on Horizontal Sections
Start with the bottom panel of your garage door. This section is easiest to reach and provides practice before tackling higher areas.
Position your insulation panel within the recessed area. Center it carefully so gaps are equal on all sides. Press the panel firmly against the door surface to engage adhesives.
Work upward to the next horizontal section. Align each panel with the one below it. Maintain consistent spacing and positioning throughout the installation. Additionally, check that panels do not interfere with door hardware or hinges.
Apply even pressure across the entire panel surface. This ensures complete adhesive contact. Hold pressure for the time specified by your adhesive manufacturer, typically 30 to 60 seconds.
Step back periodically to verify alignment. Panels should appear level and evenly spaced. Minor adjustments are easier to make during installation than after adhesives fully cure.
Addressing Door Hardware and Windows
Garage door hardware requires special attention during insulation. Hinges, brackets, and locks must remain accessible and functional.
Cut notches in insulation panels to accommodate hinges. Measure hinge placement carefully before cutting. The insulation should fit around hardware without touching moving parts. Otherwise, panels might interfere with door operation.
For garage doors with windows, measure and cut openings precisely. Windows need clearance on all sides for proper function. Some installers prefer to leave window sections uninsulated for natural light.
Cable and spring areas need complete clearance. Never insulate over these critical safety components. Maintain at least two inches of clearance around all moving mechanical parts.
Lock mechanisms require careful planning. Cut access holes that allow normal lock operation. Test locks after installing nearby insulation to confirm functionality.
Testing Door Operation After Installation
Test your garage door immediately after installing all insulation panels. Open and close the door manually first. The door should move smoothly without binding or resistance.
Listen for unusual sounds during operation. Grinding, scraping, or clicking noises indicate interference between insulation and hardware. Stop immediately and identify the problem area.
Engage your automatic garage door opener next. Watch the door through complete opening and closing cycles. The opener should not strain or hesitate. If it does, the added weight might exceed motor capacity.
Check the door balance after insulation installation. Disconnect the opener and manually lift the door halfway. A properly balanced door stays in position. If it falls or rises, spring tension needs adjustment.
According to This Old House, proper door balance is crucial for safe operation and extends opener life. Contact a professional for spring adjustments, as garage door springs store dangerous amounts of tension.
Sealing Gaps Around Insulation
Small gaps between insulation panels and door frames reduce overall effectiveness. Address these gaps to maximize energy efficiency.
Weather stripping fills gaps along door edges. Apply adhesive-backed weather stripping to door frames where panels meet the perimeter. This creates a continuous seal that blocks air infiltration.
Foam gap filler works well between insulation panels. Cut thin strips to fill spaces between adjacent panels. Press the foam firmly into gaps for a snug fit.
Avoid overfilling gaps, which can prevent proper door closure. Use minimal filler material and compress it as needed. The goal is blocking air movement without creating mechanical interference.
Inspect the door bottom seal separately from insulation. This rubber strip prevents drafts under the door. Replace worn bottom seals to complement your insulation efforts.
Maintaining Removable Insulation Panels
Regular maintenance keeps your insulation panels performing well. Inspect panels monthly for secure attachment and damage.
Clean panels periodically to remove dust and debris. Use a soft brush or vacuum with a brush attachment. Avoid harsh chemicals that might degrade insulation materials or adhesives.
Check adhesive strength seasonally. Extreme temperatures can weaken some adhesives over time. Reapply adhesive strips or tape as needed to maintain secure attachment.
Remove panels annually to inspect the door surface beneath. Look for moisture accumulation, rust, or damage. Address any issues immediately to prevent long-term problems.
Store removed panels in a dry location if you use them seasonally. Lay panels flat to prevent warping or damage. Cover them with plastic to keep dust away during storage.
Seasonal Considerations for Removable Panels
Removable insulation offers flexibility for different seasons. Many people adjust their insulation based on weather patterns.
Winter months require maximum insulation for heating efficiency. Install all panels to create a complete thermal barrier. This reduces heat loss and lowers heating costs.
Summer insulation blocks heat from entering your garage. Reflective insulation works particularly well during hot months. However, some homeowners remove insulation in summer to improve ventilation.
Spring and fall present moderate temperatures. You might choose partial insulation during these seasons. Install panels on the sections that receive direct sunlight while leaving shaded areas uninsulated.
Consider your garage use when deciding about seasonal removal. Heated or cooled garages benefit from year-round insulation. Unheated garages might only need insulation during extreme weather.
Troubleshooting Common Installation Issues
Some challenges arise during garage door insulation projects. Understanding solutions helps you address problems quickly.
Panels that do not stick properly indicate surface contamination or poor adhesive quality. Clean the door again and try stronger adhesive products. Alternatively, switch to magnetic or mechanical attachment methods.
Door binding after insulation means panels interfere with operation. Remove the affected panels and trim them smaller. Ensure adequate clearance around all moving parts.
Sagging panels suggest insufficient adhesive coverage or excessive weight. Add more attachment points across the panel surface. Consider switching to lighter insulation material.
Condensation between insulation and door indicates inadequate ventilation. This moisture can cause rust and damage. Remove panels and apply a vapor barrier before reinstalling insulation.
Noise during door operation points to loose panels or hardware contact. Secure all panels firmly and verify clearance around hinges and brackets. Add felt pads where insulation might rub against metal components.
Cost-Effectiveness of DIY Insulation
Calculating project costs helps you understand potential savings. Removable insulation panels cost significantly less than professional installation.
Material costs range from 50 to 200 dollars for most single-car garage doors. Two-car garage doors might require 100 to 300 dollars in materials. These costs are substantially lower than 400 to 1,200 dollars for professional insulation services.
Energy savings accumulate over time. Well-insulated garage doors can reduce heating and cooling costs by 10 to 20 percent in homes where garages connect to living spaces. Payback periods typically range from one to three years.
Beyond monetary savings, insulated garage doors improve comfort. Temperature-controlled garages are more pleasant for hobbies, storage, and vehicle maintenance. Additionally, insulation reduces noise from outside and from door operation itself.
Conclusion
Insulating your garage door with removable panels is a practical DIY project that delivers immediate benefits. By following these steps, you can effectively reduce energy costs, improve temperature control, and increase comfort in your garage space. The removable nature of these panels offers flexibility for renters and homeowners while requiring minimal tools and expertise. From measuring and cutting panels to proper installation and maintenance, each step contributes to a successful outcome. With proper attention to door operation and regular maintenance, your insulated garage door will provide years of efficient service and energy savings.
Frequently Asked Questions
Can removable insulation panels damage my garage door?
No, removable insulation panels do not damage garage doors when installed correctly. Use appropriate adhesives designed for temporary application, and maintain clearance around all moving parts. Avoid over-tightening mechanical fasteners if you use them.
What R-value should I look for in garage door insulation?
Most garage door insulation ranges from R-4 to R-16. For moderate climates, R-8 provides good performance. Colder regions benefit from R-12 or higher. However, extremely thick insulation might interfere with door operation in standard residential doors.
Will insulation panels void my garage door warranty?
Removable insulation panels typically do not void warranties since they cause no permanent modifications. However, check your warranty documentation or contact the manufacturer. Avoid drilling holes or making permanent alterations that might affect coverage.
How long does it take to install removable insulation panels?
Most installations take two to four hours for a standard single-car garage door. Experience level and insulation type affect the timeline. Pre-cut kits install faster than custom-cut panels. Allow extra time for your first project.
Can I use removable insulation on an already insulated garage door?
Adding removable panels to factory-insulated doors provides minimal additional benefit. The incremental R-value increase rarely justifies the effort and potential operational issues from extra weight. Focus on sealing gaps and weather stripping instead for better results.
Related Topics: